

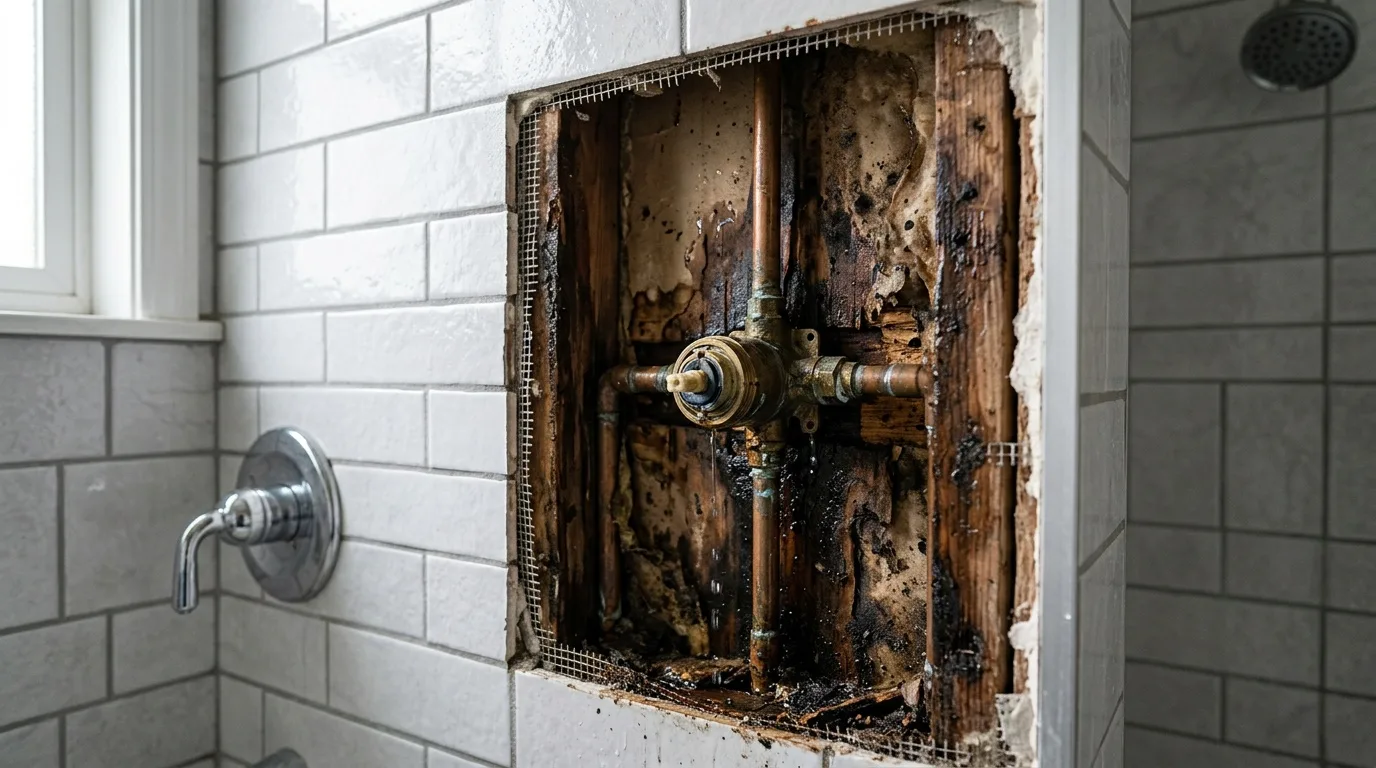
A leak behind the shower wall is dangerous not because more water flows. It is dangerous because the problem stays unnoticed for a long time. When a pipe sprays or a puddle shows up on the floor, the owner quickly understands the cause and can shut off the water. With a hidden leak, moisture slowly builds up inside the wall, the floor or the ceiling, and the damage becomes visible only after it has already spread.
The tile itself often suffers last. Water goes into the backing, the framing and the floor structure. It comes out days or weeks later: a stain on the other side of the wall, loose grout lines, a damp smell. The main principle of the search is simple. First confirm that there is a leak and what kind it is (constant or only while the shower runs). Then narrow down the area by indirect signs, and only after that open up the tile. Opening the wall "at random" is the most expensive mistake in this situation.
Signs of a Leak Behind the Shower Wall
A hidden leak rarely has one universal sign. Usually what draws attention is a combination of several changes. The earlier the symptoms are noticed, the cheaper the repair. Pay attention to the following:
- Stains on the other side. Spots, bubbling paint or rusty streaks on the wall of the next room or on the ceiling below the bathroom. This is the classic sign that water is moving inside the structure.
- Grout lines and tiles. The joints between tiles darken, the grout crumbles or comes off in places, most often near the tub or the shower. A tile starts to sound hollow: when you tap it you hear a dull sound instead of a sharp one, which means it has come loose from the base, often because of moisture.
- A musty smell. A steady smell of dampness or mold, especially in corners and along baseboards, can mean that water has been sitting in hidden places for a long time.
- Peeling paint and swelling trim. Paint lifts, drywall softens, laminate, wood floors or baseboards in the neighboring room swell for no visible reason.
- Sounds and the meter. Hissing, trickling or the noise of water with all fixtures off. The water meter keeps moving when every faucet is closed.
Keep in mind: each sign on its own can have other causes. A stain on the wall may come not from a pipe but from moisture getting in from outside, and a hollow tile is sometimes just poor adhesion. Draw conclusions from the whole set of signs. If you want a fuller list, see our guide to hidden water damage signs.
Where the Water Comes From: Valve, Cartridge, Supply Pipe, Drain or Grout
Tile by itself is not watertight. Water gets in through joints, the edges where tile meets the tub or fixtures, and cracks. But for it to collect in noticeable amounts, there has to be a source. Almost always it is one of these:
- The supply pipe. The hidden water lines in the wall have lost their seal. The leak can be microscopic: drop by drop, but around the clock.
- The valve body and its connections. The connection between the valve and the water lines is the most critical point of the installation. If the plumber overtightens the thread, a fitting can crack. If it is undertightened, it will leak.
- The cartridge. A worn cartridge can let water past even at normal pressure.
- The drain. Water from the shower passes through a bad drain connection and builds up in the base below.
- The waterproofing and the grout. Water from the shower goes through defects in the waterproofing layer behind the tile and collects in the wall or floor.
- Condensation. A cold pipe with no insulation "sweats." This is not a leak in the strict sense, but the result is the same.
How a shower valve sits in the wall
A concealed shower valve has two parts. The rough-in valve is everything inside the wall: a brass body with the water lines connected to it. The visible part is the handles, the trim plate and the spout.
Many people think a whole mechanism is hidden in the wall and will wear out. In fact there is only a static block - the valve body. Inside it are just water channels and seats for the ceramic cartridges. The cartridge itself, which opens the water and mixes it (the moving part that can wear out), sits on the outside, under the handle. If the cartridge fails, you take off the decorative handle and replace it, as with a regular faucet. The wall stays untouched.
When a valve body loses its seal, the water usually shows up on the outside first - it runs out through the trim plate or the gap between the handle and the wall, well before it soaks the wall. So a shower cartridge leaking behind the wall often shows itself as drips at the trim, not as a stain in the next room. A slow leak behind the shower wall that does reach the next room more often points to a supply connection, the drain or the waterproofing.
Quick Tests Before You Open Anything
Before you look for the location, make sure there is a leak and understand how it behaves. That determines everything else.
- Close every fixture. Faucets, the toilet tank, the washing machine and the dishwasher (shut their supply valves).
- Write down the meter. Note the water meter reading.
- Wait 2 hours. Do not use any water. If the reading changed, the leak is constant and most likely in the pipes.
- Run the shower. If the meter stands still, repeat the check while using water: run the shower for 10-15 minutes and watch the suspicious areas. Changes only during this period point to a leak tied to use - for example a defect in the waterproofing or the drain.
The EPA WaterSense leak-check guide describes the same meter check.
Narrow down the area
Go over the tile tapping it with a screwdriver handle or a coin. A sharp sound means a tight bond, a dull one means a void or a loose tile. Sketch the "dull" areas on paper: the outline often follows the direction the water spread. At the same time, look at the joints: the darkest and most damaged spots are usually closest to the source.
Water flows down and along the path of least resistance. Check the room below: a stain on the ceiling is rarely right under the leak - it is shifted along the joists. The same goes for neighboring walls: wet spots at the bottom of a wall can mean the source is a few feet away.
A household moisture meter for wood and concrete is not expensive and makes the job much easier. Measure moisture at several points at equal intervals - for example in a grid every foot and a half. Spots with noticeably higher readings form a "map" that leads to the source.
The Access Panel
Before you suspect the pipes inside the wall, rule out the obvious. Look at any access panels, if they exist: sometimes access to the connections was already planned. Such a panel is usually placed on the back side of the wall, in the next room or a closet, or it is hidden by a removable plate.
- Shut the water off at the stops, which are usually behind the panel.
- Inspect the threaded connections and supply lines for drops or wet marks.
- If the cartridge leaks, it is replaced. If a connection leaks, it is carefully tightened or the seal is replaced. Do not overtighten the thread, or you can damage the part.
- Before closing the panel, turn the water on and check the system.
If there is no panel, access to the valve has to be made through the wall - by cutting into it or removing the tile. This is one of the reasons such a panel should be planned in advance.
Repair and Drying the Wall Cavity
What happens next depends on what turned out to be the source:
- A pipe in the wall. A local area over the damage is opened, the pipe segment is repaired or replaced, and the backing and tile are restored. Matching tile of the same shade may not be available - think ahead about how much the visual result matters to you, and discuss carefully removing whole tiles to put them back.
- A waterproofing defect. A local repair is possible only when the damaged area is small; more often the waterproofing of the whole wet zone has to be restored and the tile reset. This is the most expensive scenario, so decide after an inspection by a pro.
- A connection or fixture. Lucky: the wall does not have to be opened. The repair comes down to replacing a supply line, seals or the cartridge.
- Condensation. Cold water pipes in the wall are insulated, and the room's ventilation is checked. Otherwise the problem will come back.
Do not close up a wet wall. Resealing joints or resetting a few tiles over a wet base works for a couple of weeks: the moisture stays inside and will show up again, this time with mold.
After the leak is fixed, the wall cavity has to dry before the new finish goes on. How long this takes depends on the material, its thickness and ventilation; forced heat speeds the process only partly and can cause cracking. Go not by the calendar but by measured moisture - it is checked with a moisture meter before closing the wall. When the water has spread into framing and insulation, professional water damage restoration services are usually the next step.
Checking for Mold
The mistake many homeowners make is that they look only at the source of the water. In practice the damage reaches everything the moisture touches:
- Finish materials can lose their look or strength.
- Wood framing can warp with long wetting.
- Insulation can lose its properties.
- Constant dampness creates conditions for mold.
- Water can reach electrical parts, which raises the risk of damage.
A small wet stain or a faint damp smell is often treated as a cosmetic problem. But such changes can be the first signal that water is already getting where it should not be. It is better to find the cause than simply cover the marks with paint or new finish. When the wall is open, look at the back of the drywall and the studs. If you find dark growth, our article on telling black mold from mildew helps sort out what you are looking at, and larger areas call for mold remediation in the wall cavity.
Common Mistakes
- Opening the wall before diagnosis. Without locating the leak, large areas have to be taken apart, and the repair drags on and costs more. First the moisture map and the meter check, then the hammer.
- Looking only where the stain is. Water moves. A stain in the next room may be several feet from the real point of the leak.
- Forgetting other lines. Besides water, a wall can hold electrical wiring and other lines. Before opening, find out where they run and turn off the power to that circuit.
- Putting it off when the leak is "small." A slow leak destroys the base for months. The longer water stays, the more likely it is that not a patch but the whole wall will have to be replaced.
When It Cannot Wait
Some situations call for a faster response because the risk of growing damage is higher:
- Water near electrical devices or wiring.
- The wet spot is visibly growing.
- Constant sound of water with the faucets closed.
- Signs of damage to the ceiling or floor structure below.
- The problem stays after the accessible valves are shut.
In such cases the task is not to find every inch of the damage yourself, but to limit possible damage and decide what to do next. Record the signs: where the dampness appeared, when it was found, whether the meter readings change. Do not hide the traces of moisture until the cause is known. You can read more about our restoration team, see what local homeowners have said, browse more water damage articles or go back to the La Mesa restoration home page.