

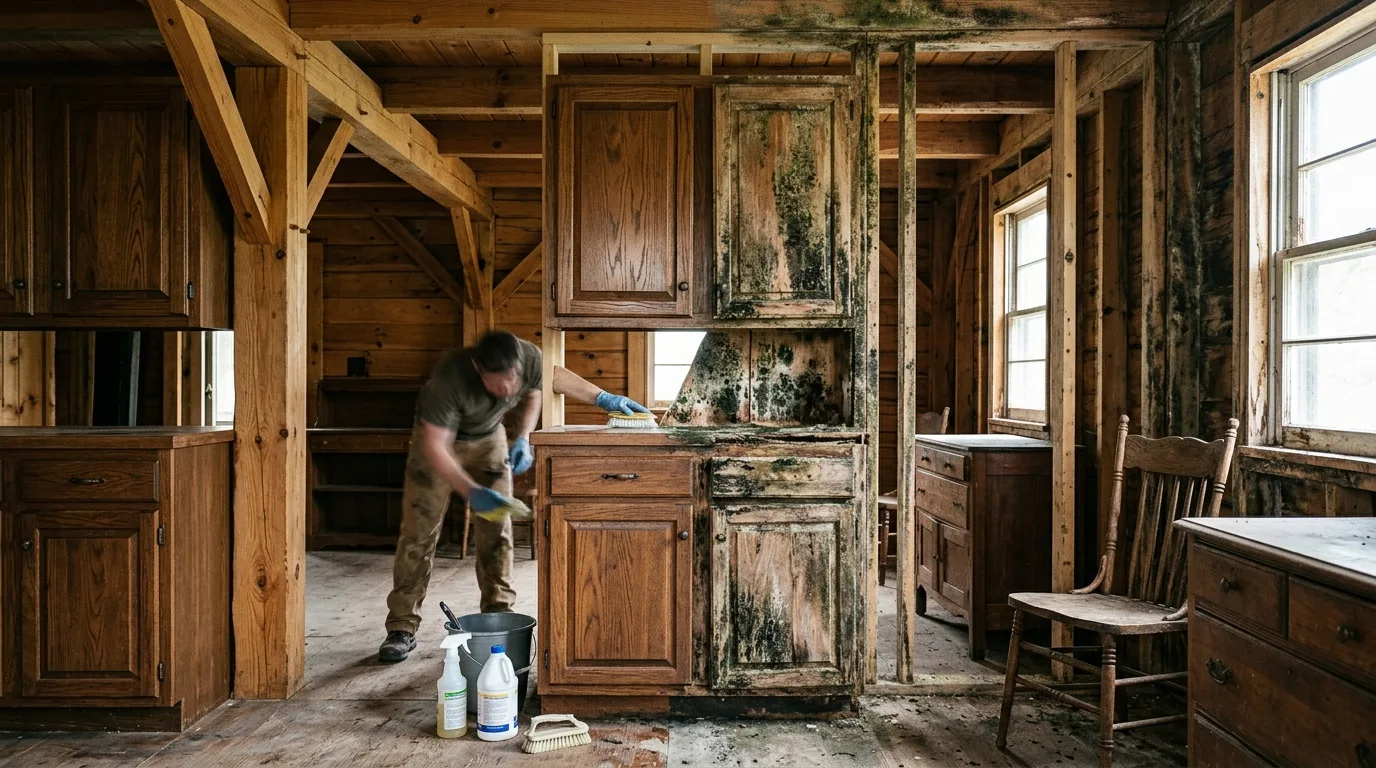
Mold on wood is a common problem after a leak, a flooded cabinet or a long damp season. Wood absorbs water, and once it stays wet, mold has everything it needs. Some of that growth comes off with a brush and a cleaning solution. Some of it does not, and the piece or the board has to be cut out or replaced.
Below is what is known about mold on wood furniture, mold on wood cabinets and mold on framing: how to tell surface growth from deep growth, what the colors mean, what kills mold on wood at home, and when the material has to go.
Surface growth and deep growth
Mold is not only the spot you see. It grows roots (mycelium) into the material it settles on, and that is why it is hard to remove completely. On a smooth, sealed surface the roots have little to hold on to. On bare, porous wood they go into the fibers.
Before choosing a method, decide what kind of damage you are dealing with:
- Growth on a sealed or painted surface. Usually cleaned off.
- Growth in bare, porous wood. Sanded down to sound wood once it is dry.
- Wood that is soft, crumbles or cracks. Cut out and replaced.
- Wood moisture. Check how wet the wood is. Treatment is done once the wood has dried out, not while it is still soaked.
If the wood is soft, crumbles or cracks, the problem is no longer on the surface.
White, green and black mold on wood
Color does not tell you the exact species, but it gives a rough idea of what you are looking at. For a closer comparison of dark growth, see our guide to black mold vs mildew.
Black mold
Black mold includes several species. It appears as dark, nearly black or dark green spots. At an early stage it looks like small specks, like pepper, which later merge into large colonies. A dry, dusty texture means mature spores. A wet, slimy texture means the mold is actively growing. It is often found on window frames and other places where condensation collects.
Green mold
Green mold looks like bright green, uneven fuzz with white specks. It grows on walls, furniture and ceilings. It should be removed as early as possible.
White mold on wood
White mold indoors can look like a fluffy white or light gray coating that later develops black dots. These dots are the spore cases. On wood, white mold is usually among the types that can still be removed chemically, if the wood underneath is sound.
Blue-gray film
Some molds attack wood specifically, such as furniture, and leave a blue-gray film. This is called blue stain.
Before you start: safety
Wear a respirator, rubber gloves and goggles, and ventilate the room. Close the door to the affected room so spores do not spread through the house. Do not dry-sweep. If you have allergies or breathing problems, consider hiring professionals.
Also cover or move furniture, food and belongings that are not affected. Bag contaminated rags and other waste and throw them out right away.
Size matters too. According to the EPA's advice on mold cleanup at home, a moldy area under about 10 square feet (roughly 3 by 3 feet) can usually be cleaned by the homeowner. Larger areas, or lots of water damage, call for EPA's remediation guidance or an experienced professional, such as a mold remediation team in La Mesa.
Finished wood furniture and cabinets
Varnished or painted wood is easier to clean, because the mold mostly sits on top of the finish. The general order of work:
- Mist the surface lightly with water. This reduces the number of spores that go into the air.
- Remove visible mold. Use a stiff brush or a scraper.
- Apply a cleaning solution or an antifungal product. Treat the cleaned area and a little beyond it, following the label. Use a brush, roller or sprayer.
- Let it dry fully. Two or three coats are often needed.
- Repeat if needed. If mold remains after the first pass, scrub firmly and repeat, since the roots may be deep.
Test any product on a hidden spot first. Some of them lighten or stain the finish.
How to get rid of mold on wood with home remedies
These are the common home methods. They work on light, surface growth:
- Hydrogen peroxide. Apply a 3% solution, wait 10 minutes, wipe. If mold remains, repeat and scrub harder.
- White vinegar. Spray undiluted vinegar, wait about 1.5 hours, wipe with a damp cloth and let it dry. The smell fades after a few hours.
- Baking soda. Dissolve 2 tablespoons in about a quart of water. Spray, wait a few minutes, rinse and repeat.
- Borax. Vacuum loose particles first. Mix borax with water at 1:10 and apply with a brush. It is not rinsed off; it dries on its own and helps prevent new growth.
- Bleach. Skip chlorine bleach on wood: it can damage the finish. Never mix bleach with vinegar, ammonia or other cleaners.
For the smell left after cleaning, sprinkle baking soda on the surface and leave it for several hours, or set out activated charcoal. The damp odor usually fades over a few hours.
Unfinished wood: sanding and vacuuming
Bare wood takes mold deeper, so washing alone is usually not enough. The order of work:
- Protect yourself. Mask, goggles, gloves.
- Clean the surface. Remove grease, dirt and old paint, varnish or wax.
- Bleach stained areas. If there is blue stain or light mold, use an oxygen bleach.
- Sand. First with coarse sandpaper, then finer. Sanding removes the open fibers that soak up moisture, but sanding by itself does not kill mold. It prepares the surface.
- Remove the dust. Collect it with a vacuum fitted with a HEPA filter rather than a broom.
- Dry the wood completely. Wash if needed, then let it dry.
- Apply a mold-resistant wood treatment. Treat damaged areas and hard-to-reach spots (joints, corners) first. Apply several thin coats as the label directs, letting each one dry.
Follow the product label for temperature, humidity and number of coats, and work on dry, clean wood.
Framing after a leak
Studs, joists and beams get wet from below, from a roof leak or from a broken pipe, and often dry slowly because they are hidden. Wood rots because of decay fungi that grow in wood that stays wet. Risks include damp locations, temperatures from about 36°F to 104°F, high moisture in the wood, and contact with soil.
The first job is to dry the framing out and stop the water. Without that, any treatment will not hold. If a leak soaked walls or floors, professional water damage restoration deals with the drying before the mold work begins. After drying, the same steps apply as for unfinished wood: clean, sand, dry, treat with a mold-resistant wood product. End grain and cut ends are the most vulnerable spots and are sealed separately.
When to replace instead of clean
- Brown or black rot, or fungal growths. These are cut out or sanded down to sound wood. If there is no sound wood left, the piece is replaced.
- Wood that is soft, crumbles or keeps cracking. Act quickly if wood discolors or cracks.
- Deep penetration. If mold has gone deep, the finish and nearby materials such as drywall and plaster may have to be removed.
- Large areas. More than about 10 square feet, or a lot of water damage, is beyond home cleaning.
Water damage vs mold on wood is also worth separating. A water stain is a mark; mold is growth. Furniture that only got wet can often be dried and kept. While a room is being worked on, belongings can be moved out through contents pack-out services so they are not exposed to the spores.
Prevention
- Fix the moisture source. Faulty ventilation, leaks in pipes, windows and walls.
- Keep indoor humidity at 40-60%. Mold grows well at about 70%.
- Air out rooms. Open windows or run exhaust fans regularly.
- Leave a gap between furniture and outside walls so air can move.
- Do not put wet items in closed cabinets and wardrobes.
- Protect treated wood. Use a mold-resistant wood treatment, and once a year check joints and corners and treat new spots locally.
More articles on water, fire and mold are on our restoration news and tips page. You can also read who we are and how we work, see what La Mesa customers say, or go back to the La Mesa restoration home page.